
How to Print Durable Codes on Plastic Caps, Lids, and Closures
2026-08-24(14)Views

The Closure Has Four Jobs Before It Has a Code
A closure must seal, protect, open correctly, and preserve product integrity. Coding is added on top of those functions. The printed mark cannot interfere with sealing surfaces, liner performance, tamper evidence, opening torque, or required inspection. That is why the qualification target is the coded and applied closure, not an attractive print on a loose cap at a desk.
Start by defining what the code is for: internal lot control, expiry date, serialization, consumer information, or a machine-readable identifier. Then identify the smallest visible zone that remains stable through feeding, printing, capping, packing, and use.
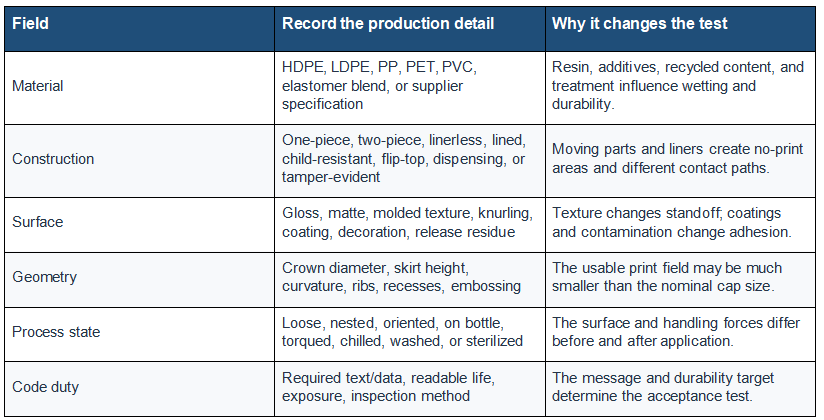
Create a Closure Identity Card
Follow the Cap Through the Handling Chain
1. Orient
Loose caps roll, nest, flip, and present at random angles. If the code must sit in a defined location, the process needs a nest, tray, chute, star wheel, bowl feeder, or operator fixture that establishes orientation before printing. A handheld printer is practical for low-volume batches, rework, sample qualification, and tray-based offline coding; it is not a substitute for engineered high-speed part handling.
2. Support
The target zone must stay within the printer’s usable standoff while the cap is coded. A crown can be supported in a pocket or tray. A skirt often needs a mandrel, V-block, or controlled rolling fixture. The fixture should locate the part without touching the intended wet-ink path.
3. Print
Use the shortest message that meets the traceability need. Confirm character height, line count, edge clearance, direction, contrast, and whether molded features cut through strokes. Lock the message and settings so the operator cannot accidentally shift fixed text or remove required fields.
4. Dry without contact
Map the first guide, belt, chute, hand, capper chuck, or adjacent-cap contact after printing. The code must become handling-safe before that event. If caps are dumped together immediately, even a fast-dry ink may transfer under pressure. Trays or controlled spacing can protect a short offline batch.
5. Apply and challenge
Run the printed closure through the real capper or application tool. Inspect after torque, removal, reclosure, packing, condensation, cleaning, and the required shelf-life simulation. A mark that survives a finger rub but fails under the capper chuck is not approved.
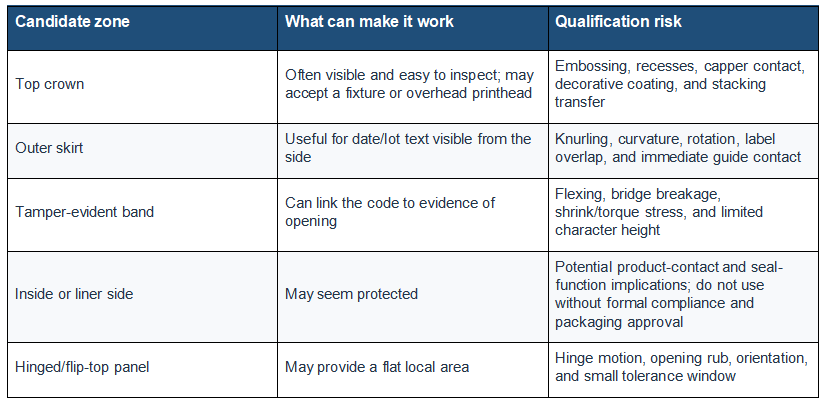
Select the Print Zone by Risk, Not Convenience
Design a Repeatable Offline Fixture
1. Define one datum.Choose the cap feature that always locates the part: crown edge, skirt diameter, hinge, tab, or molded key.
2. Control three motions.Prevent the cap from sliding, rotating, and tipping during the print pass without crushing or deforming it.
3. Protect standoff.Build a guide surface that keeps the printhead path consistent while clearing embossing and raised features.
4. Create a wet-ink exit.Remove the cap in a direction that cannot drag the fresh code across a finger, fixture wall, or neighboring cap.
5. Make errors visible.Use an asymmetric pocket, color mark, or simple go/no-go feature so incorrect orientation is obvious.
6. Validate the operator cycle.Measure throughput, fatigue, misorientation, and print variation across representative operators and a full work period.
Do not publish a throughput promise based on one expert operator. Record the tested part count, operator, fixture, message, environment, and reject definition. If demand exceeds a controlled manual cycle, evaluate a semi-automatic or integrated closure-coding station.
Separate Adhesion Failure from Mechanical Damage
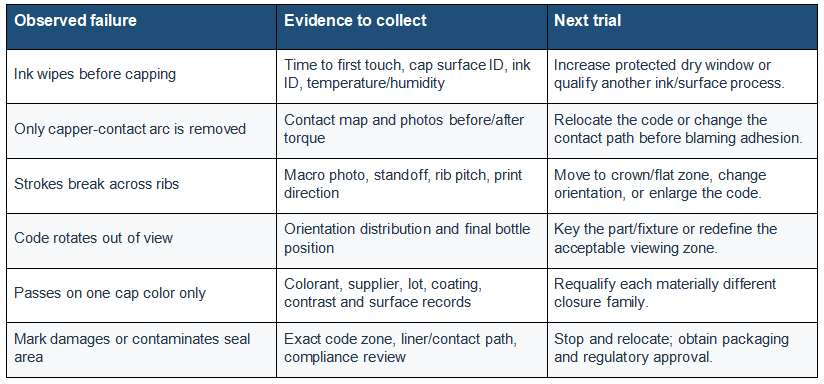
When the resin, treatment, or coating is uncertain, use the controlled PE vs PP vs PET vs PVC ink adhesion test before selecting a production recipe. If a cap carries a machine-readable symbol, continue with printing scannable barcodes and QR codes on plastic packaging so the final curved, capped part is verified rather than judged by appearance alone.
For the broader material, ink, print-height, and sample-test decisions behind these steps, return to the core guide for handheld inkjet printing on plastic.
Release Criteria for a Coded Closure
1. Legibility: Every required character remains readable in the final applied position.
2. Location: The code falls inside the approved zone across normal part and fixture tolerances.
3. Durability: The mark passes buyer-defined contact, torque, opening, reclosure, condensation, abrasion, and storage challenges.
4. Function: The code does not affect seal integrity, liner function, tamper evidence, torque, or consumer use.
5. Traceability: Printer, ink, settings, part lot, operator, environment, and evidence are tied to the approval record.
Ready to Improve Your Printing Efficiency?
Get expert advice and the best solution tailored to your business.
Get Your Free Quote Within 24 Hours✔ Fast response ✔ Custom solution ✔ No obligation
Buyer FAQs
Can a handheld inkjet printer print on bottle caps?
Yes, particularly for short runs, offline tray coding, rework, and sample testing. Repeatability usually requires a nest or guide. Continuous high-speed loose-cap coding requires engineered orientation, triggering, support, and dry-path control.
Should the cap be printed before or after capping?
Before capping may provide better access but exposes the fresh code to cap handling and capper contact. After capping fixes orientation but introduces bottle geometry, line access, and possible condensation. Trial both states against the real process.
Can the inside of a cap be coded?
Do not assume it is acceptable. The inside may be a food, beverage, pharmaceutical, cosmetic, or seal-contact surface. Use only after the responsible packaging and compliance teams approve the exact ink, location, process, and intended use.
+MoreRelated recommendations
-
How to Print Durable Codes on Plastic Caps, Lids, and Closures
Learn how to print durable lot and date codes on plastic cap...
-
How to Print Batch Codes on Flexible Plastic Bags and Pouches
Learn how to print durable batch codes on flexible plastic b...
-
How to Print Expiry Dates on Plastic Bottles Without Smudging
Learn how to print expiry dates on plastic bottles without s...
-
PE vs PP vs PET vs PVC: Ink Adhesion Test
Compare PE, PP, PET, and PVC with a controlled ink adhesion ...
Contact Us

Service phone number+8618759952301
—— Add WeChat communication


